
CapCut long video to shorts: the steps and the four traps
I ran a 35-minute panel through CapCut's long video to shorts on the free plan: the exact steps, the eight clips it returned, and the four traps I hit.
Contents
The short answer
Sign in to CapCut on the web, open Long video to shorts from the homepage, upload your recording, choose a caption template and a duration, and press Convert. Left on Auto, my 35-minute panel came back as eight chaptered clips of 1:26 to 3:58, not sub-minute highlights. Then export each clip at 1080p and download it the moment it finishes, one at a time, because the free plan’s 512MB cloud store filled after four 1080p exports of two-to-four-minute clips.
| Step | What you do | What to watch for |
|---|---|---|
| 1 | Open Long video to shorts, signed in, on the web | I only confirmed it on the web version |
| 2 | Upload and check the meter | 60 source minutes a month free |
| 3 | Choose template and duration | Auto returned 1:26–3:58 clips |
| 4 | Convert and wait | the 30 loading tiles are a placeholder |
| 5 | Review the results | tags on some clips, no scores |
| 6 | Export at 1080p | resets to 720p on every reload |
| 7 | Download, then delete | exports render into a 512MB store on the free plan |
I ran every step of this on 14 September 2026 with a 35-minute conference panel on a free account, and the rest of this page is what each step actually looked like, including the four traps I hit — the storage refusal cost me an export, and the click-swallowing export dialog made me run one twice.
How does CapCut’s long video to shorts work?
Long video to shorts is CapCut’s automatic clipper. You give it a recording you already have, and it cuts that into vertical 9:16 clips with captions burned in, reframed around the speaker in the previews I saw. It is a separate tool from CapCut’s full video editor, though each finished clip has an Edit button that opens it there.
It runs on a meter worth understanding before you upload anything, and the settings screen shows you the cost before you press Convert. CapCut counts the length of source video converted, not the number or length of clips you get out. The free plan includes 60 of those minutes a month; Pro adds 240, and CapCut pricing covers what Pro costs where you are. My 35-minute source cost exactly 35 minutes.
Everything below uses one file so the numbers stay comparable: “An Honest Conversation on AI and Humanity”, a 35 minute 27 second multi-speaker panel from the World Economic Forum’s 2026 annual meeting, released under a Creative Commons Attribution licence. That licence is why I can show frames from the output. I used CapCut’s online web version, signed in, on the free plan; the CapCut review has the full verdict on the tool. I did not test the mobile or desktop apps, and where their behaviour might differ I say so.
Step 1: Find Long video to shorts
On the day I used it, the tool sat in the Popular features row of CapCut’s signed-in web homepage, alongside Video Editor, Video Studio, Design Studio, Text to speech, Generate captions and Remove background. No upgrade was needed to open it on a free account.
It is worth saying because some people cannot find it. One of the related searches Google offers for this term is “CapCut long video to shorts not showing”, and a Reddit thread sitting on the first results page asks whether CapCut removed the feature. I can only speak for the surface I checked: signed in, in a browser, in September 2026, it was there and promoted. I did not open the phone or desktop apps, so if you are on either and it is missing, the web version is the one place I can confirm it existed.
The tool page also carried a card reading “Try our desktop app now and enjoy 1 day of Pro for free.” Take that as a hint about where CapCut would prefer you work, not as evidence the web version is going anywhere.
Step 2: Upload your file and read the meter
Upload the recording, and before touching any settings, look at the cost band beside the Convert button. It tells you what the job will take from your monthly allowance before you spend it.

The tool page states the terms plainly, verbatim:
You can convert 60 minutes of long videos to shorts for free every month. Join Pro to get 240 extra minutes per month. Time consumed = video duration converted | Time left 60m Upload a video under 3 hours and 10 GB. This feature supports more than 20 languages.
Two things are worth knowing here. First, the three-hour and 10GB ceiling is what I read on the free plan; I did not check whether it changes on a paid tier. Second, these clipping minutes are a completely separate budget from CapCut’s AI credits. My account header showed 80 credits, which belong to its video-generation tools. If you have been saving credits for this, you have been saving the wrong thing.
A 35-minute file leaves you 25 minutes for the rest of the month on the free plan. Budget accordingly if you record more than one long episode.
Step 3: Choose a caption template and a duration
The duration setting decides what comes back, and on my run, set to Auto, it made clips far longer than a short.
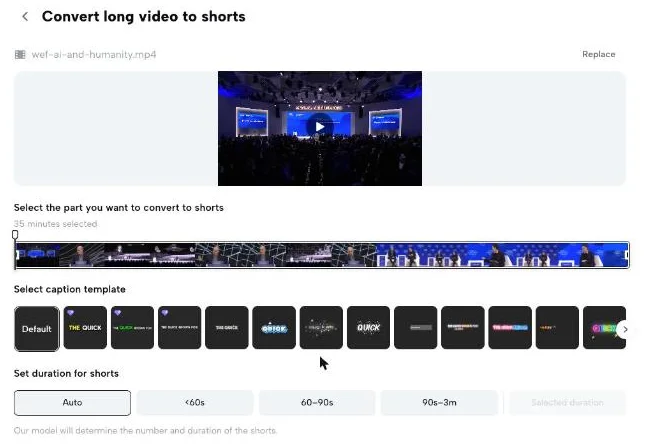
The screen has three controls. You can select which part of the recording to convert, which was set to the full 35 minutes when I used it. You pick a caption template, set to Default on my run. And you set a duration with four buttons; the screen also shows a greyed-out “Selected duration” control, which I did not use:
| Duration button | What the screen shows | Did I run it? |
|---|---|---|
| Auto | ”Our model will determine the number and duration of the shorts.” | Yes, and it returned 8 clips of 1:26–3:58 |
| <60s | ”Our model will try to match the duration of the shorts to your selected range.” | Yes, tested separately on 19 September — see below |
| 60–90s | label only, not selected or tested | No, not tested |
| 90s–3m | label only, not selected or tested | No, not tested |
I left it on Auto so the run would be comparable with other tools I tested on the same file. Auto chose long clips — the shortest ran 1:26 and the longest 3:58, well past what most people mean by a short. If you want sub-minute moments for TikTok or Reels, the fixed buckets look like the obvious setting to try. So I tried one.
What the under-60s preset actually returns
On 19 September I ran the first 12 minutes of the same panel twice on the same free account, changing nothing but the duration button. The meter only had 25 free minutes left, which is why the source is 12 minutes rather than the original 35.
| Auto | <60s | |
|---|---|---|
| Clips returned | 6 | 3 |
| Length range | 1:09 – 2:33 | 1:04 – 1:08 |
| Clips actually under 60s | 0 of 6 | 0 of 3 |
| Share of the source used | 88.3% | 27.4% |
Not one clip came back under a minute. The setting labelled under-60s produced 1:04, 1:05 and 1:08 — over by four, five and eight seconds. The helper text under the button is more honest than the label: it says the model will “try to match” your range, not that it will hold to it. If you need a file that is genuinely under sixty seconds, you are trimming it yourself afterwards.
Two things it does do. It halves the output, from six clips to three. And it stops the chaptering: coverage drops from 88.3% of the source to 27.4%, and the three clips are separate picks rather than a front-to-back division. Two of the three start at the same timestamps Auto chose — 02:48 and 08:23 — so it finds the same moments and cuts them much tighter.
One more difference, unprompted: the titles change register. For the moment starting at 08:23, Auto wrote “Does AI Really Feel? The Difference Between Words and Emotions”; the under-60s run wrote “Can AI Feel Love? The Deep Question About AI and Human Emotions You Must Hear!” Same footage, and the second one is selling harder.
⚠️ A 12-minute source is not the 35-minute one, so the clip counts are not comparable with the eight above. What it does show is that Auto’s clip length tracks the length of what you feed it: on 12 minutes, Auto’s longest was 2:33, where on 35 minutes it was 3:58.
Step 4: Convert, and ignore the loading screen
Press Convert and the job runs in the background. The progress screen offered to notify me through CapCut’s Task center and by email, and said the page could be closed.
Its estimate read “Converting… 0%, 13 minutes left”. I submitted at 10:53:23 and the results were there by 11:02:51, so it took at most about nine and a half minutes for 35 minutes of footage. I did not catch the exact moment it finished, so treat that as an upper bound rather than a precise time.
Two things around this step will mislead you if you let them.
The loading grid is a placeholder. It renders 30 placeholder tiles whatever the real count turns out to be. It is a fixed skeleton, not a preview. I got eight clips back, not thirty, so do not read a number off it.
The “Leave site?” warning is spurious. When I left the results page, the browser raised a “Leave site?” dialog. The job was not lost — it appeared afterwards under My projects, labelled 8 shorts. And while it is still converting, the progress screen itself says the page can be closed.
Step 5: Review what came back
My 35-minute panel returned eight clips.
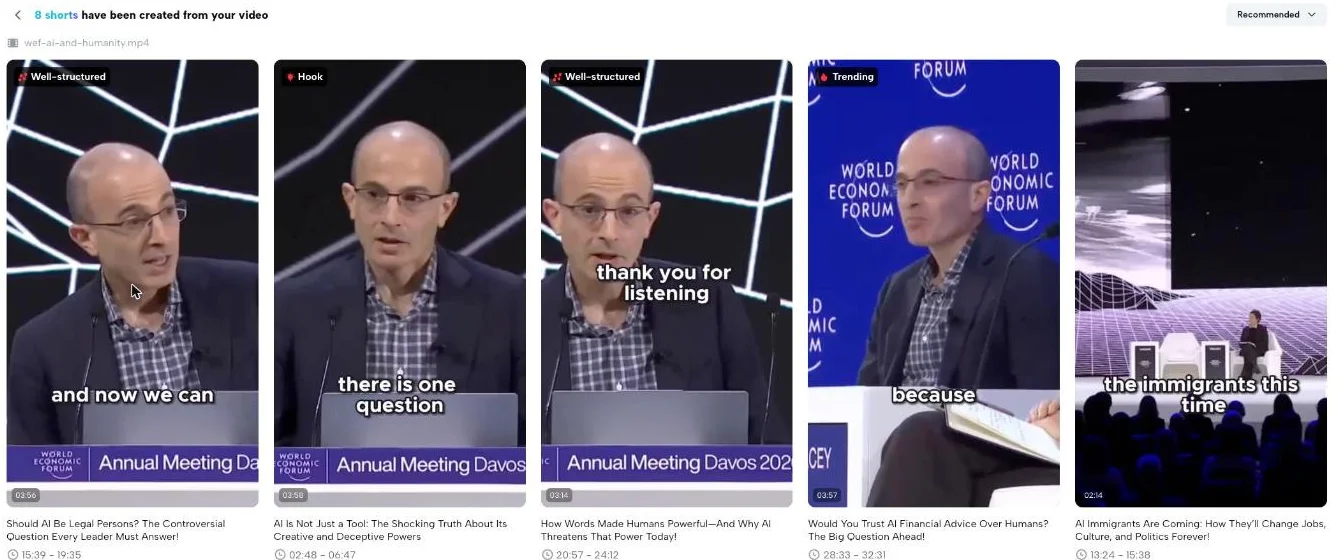
| # | Length | Tag | From the source |
|---|---|---|---|
| 1 | 3:56 | Well-structured | 15:39–19:35 |
| 2 | 3:58 | Hook | 02:48–06:47 |
| 3 | 3:14 | Well-structured | 20:57–24:12 |
| 4 | 3:57 | Trending | 28:33–32:31 |
| 5 | 2:14 | none | 13:24–15:38 |
| 6 | 1:26 | none | 33:13–34:40 |
| 7 | 3:20 | none | 10:02–13:22 |
| 8 | 3:56 | none | 24:12–28:09 |
Put those source ranges in order and the shape becomes clear. The eight clips run from near the start of the panel to near its end, one after another, never overlapping. The eight downloaded files add up to 26 minutes 5 seconds — 73.6% of the whole recording. On Auto, this tool divided my panel into chapters rather than choosing its best moments.
There is no numeric score. Four clips carry a short qualitative tag — Well-structured twice, Hook and Trending — and the other four carry nothing. Each clip has thumbs up and thumbs down buttons, and the grid can be sorted by Recommended. Every clip offers two actions: Export, which renders a file, and Edit, which opens it in CapCut’s full editor.
The previews were vertical, captioned, and reframed around the active speaker. Across the mid-point frames I checked from the eight downloaded files, the crop sat on whoever was speaking in each clip, not on one fixed person.
Step 6: Export at the right resolution
Open Export on a clip and check the resolution before anything else. The ladder runs 360p, 480p, 720p, 1080p, 2k and 4k, and it defaults to 720p. None of the options carried a Pro badge on my free account.
| Export setting | What I found |
|---|---|
| Default resolution | 720p |
| Resolution I used | 1080p, on the free plan |
| What the file measured | 1080×1920, 30fps on all eight |
| Watermark | none, on a mid-point frame from each |
| 2k and 4k | listed; not tested |
| Time per clip | roughly 2.5 to 5 minutes at 1080p; the 1:26 clip took about 2 |
The dialog also offers to publish straight to TikTok, YouTube, YouTube Shorts, a Facebook Page and Instagram Reels, with a Schedule option marked Free. Whether what CapCut hands you will post as a Short is a separate question, and one worth checking against the three-minute ceiling — the AI YouTube Shorts generator comparison works it through for all four tools.
I exported all eight at 1080p on the free plan, downloaded each one and checked it with ffprobe. Every file came back 1080×1920 at 30 frames a second, every duration matched the listed length to within a second, and a frame taken from the middle of each showed no CapCut mark at all. It was the only clean free export of the four tools I ran, which is why free AI clip generator puts CapCut first among the free tiers I ran.
Step 7: Download, then clear the space
On the free plan every export renders into a cloud Space before you can download it, that Space holds 512MB, and this is the step I got wrong. Four 1080p exports of clips running two to four minutes took mine to a reading of 633.56MB against the 512MB limit. A later export was refused with a modal reading “Couldn’t export — Your space is almost full. Expand your space storage and try again.” Two others failed with no message at all; nothing on screen said why, so I cannot tie those two to storage.
The way to avoid the refusal is a routine, not a setting:
- Export one clip.
- Download it from the export dialog as soon as it finishes.
- Delete it from Space.
- Move to the next clip.
Deleting frees the quota immediately. On my account the counter dropped from 407.40 to 239.59 and then to zero as I cleared files, even though the confirmation dialog warns that deleted items stay in Trash for 30 days. One small oddity if you check the arithmetic: the counter appears to report MiB while labelling it MB, so the numbers will not add up exactly in decimal megabytes.
A worked example: one 35-minute panel
Here is what the whole run cost and produced, end to end, on a free account.
| Result | |
|---|---|
| Source | 35:27 conference panel |
| Clipping minutes used | 35 of 60 |
| Time to convert | at most about 9.5 minutes, estimated 13 |
| Clips returned | 8, from 1:26 to 3:58 |
| Share of the source covered | 73.6% |
| Files exported and downloaded | all 8, at 1080p |
| Total output | 26:05, about 1.33GB |
| Watermarks | none |
| Money spent | $0 |
The line to notice is total output. Eight 1080p files came to about 1.33GB against a 512MB Space limit, so on the free plan, at 1080p with Auto-length clips, I could not hold the output of that one panel in CapCut’s cloud at once. You have to cycle through it.
A second example: budgeting a weekly podcast
The free allowance is easy to outgrow, and the arithmetic is worth doing before you commit a show to this workflow. This is a calculation from the meter above, not a second test, and it assumes four episodes in a month.
| Scenario, calculated from the meter, not tested | Source minutes a month | Free plan (60), calculated | Pro (60 + 240 = 300), calculated |
|---|---|---|---|
| One 35-minute panel, like mine | 35 | fits, 25 left | fits |
| A weekly 30-minute show | about 120 | used up by the end of week 2 | fits |
| A weekly 45-minute show | about 180 | runs out in week 2 | fits |
| A weekly 90-minute show | about 360 | runs out in week 1 | runs out in week 4 |
Because the meter counts the source rather than the output, one way to stretch it may be to convert less of the recording. Step 3’s first control lets you select only part of the file, and CapCut’s own formula, “Time consumed = video duration converted”, implies you would be charged for the part you select rather than the whole upload. I never converted a partial selection, so I cannot confirm that, or tell you whether a narrower selection changes which moments the tool picks.
Storage is the second budget, and unlike the minutes it can be cleared and reused. At the sizes I measured, eight 1080p clips from one episode came to roughly 1.33GB, so on the free plan, with Auto-length clips at 1080p, one episode’s output did not fit in the store even once — a weekly show with episodes this size would mean downloading and clearing Space within every batch.
The four traps I hit
Trap 1: the 512MB store fills before you download
Exports land in Space first, and four 1080p exports of clips running two to four minutes filled it on my free account. The refusal modal is at least clear. Two more exports failed silently in the same batch; nothing tied them to storage, but a full Space is what I would rule out first.
Trap 2: closing the export dialog loses the handoff
When an export finishes, the dialog is the only place the flow hands you the file. Minimise or close it and reopening Export for that clip offers a fresh export. The finished file still exists in Space — right-click its card there and choose Download — but nothing in the flow tells you that, and it never appears under Library, in either Projects or Generated assets.
This trap is also how my Space filled in the first place. I started each export, minimised the dialog, and moved on to the next clip, so four finished renders piled up before I had downloaded any of them.
Trap 3: the resolution drops back to 720p on reload
Choose 1080p and it holds between clips for the rest of the session. Reload the page and it silently resets to 720p. I confirmed this across three separate exports. Check the setting every time you come back.
Trap 4: a finished dialog swallows your clicks
A completed export dialog can sit over the results grid and intercept clicks meant for the clip tiles beneath it. A click meant for one clip landed on the overlay instead, and I exported clip 2 twice. Download the file, then close the dialog deliberately before choosing the next clip.
Which settings should you use?
- You want sub-minute clips for TikTok, Reels or Shorts → under 60s gets you closest, but it will not get you under a minute: it returned 1:04, 1:05 and 1:08 on my test. Budget a trim.
- You want a long talk split into sections → leave it on Auto. That is exactly what it produced for me.
- You are on the free plan with a long recording → export and download one clip at a time, deleting each from Space before the next.
- You publish straight to social → the export dialog offers direct posting to TikTok, YouTube, Facebook and Instagram. I did not use it, so I cannot tell you whether a direct post still lands in your Space first.
- Skip this tool if you need a scored shortlist of short moments ranked against each other. CapCut labelled four of my eight clips and scored none of them, and on Auto it cut the recording into chapters rather than choosing highlights.
If you need highlights rather than chapters
CapCut on Auto answered a different question from the one most clipping tools answer. If what you need is dozens of short candidate moments ranked against each other, two tools I ran on this same panel are built for that.
Vizard found 30 clips in the same file; its free plan released ten, all running 32 to 56 seconds. The Vizard review has the full run. OpusClip found 32 on a Pro trial account and scores each one, with an XML export for Premiere Pro and DaVinci Resolve; the OpusClip review covers it. Vizard’s free export and OpusClip’s trial export both carried a watermark, which CapCut’s free export did not.
For all four tools I ran on this file side by side — CapCut, Vizard, OpusClip and Submagic — the best AI clipping tool has the comparison, and free AI clip generator covers what each one actually lets you keep without paying.
The final word
Of the four clipping tools I ran on this file, CapCut’s long video to shorts was the only one to hand back a clean 1080p file on a free plan, and the steps to get there are simple. What caught me was everything around them: on Auto my run came back as chapters rather than shorts, 512MB of storage filled after four 1080p exports of two-to-four-minute clips, and closing the export dialog stopped it handing me the file. If you want shorts, the under-60s setting gets you closest — 1:04 to 1:08 on my test, so budget a trim — and download one clip at a time.
The CapCut review weighs whether the tool is worth using at all, and CapCut pricing explains what Pro costs where you are.
Frequently asked questions
How do you turn a long video into shorts in CapCut?
Sign in on the web, open Long video to shorts from the Popular features row on the homepage, upload the file, and pick a caption template and a duration before pressing Convert. CapCut shows what the job will cost against your monthly allowance before you commit — mine read Time needed 35m against Time left 60m for a 35-minute panel.
The conversion runs in the background and you can close the page. Mine was done within about nine and a half minutes against an on-screen estimate of thirteen. Each result gets its own Export button. Set 1080p before every export session, because the resolution drops back to 720p whenever the page reloads, and download each file as soon as it finishes rather than queuing several. On the free plan every render lands in a 512MB cloud store first, and four 1080p exports of two-to-four-minute clips filled mine.
Why can't I find long video to shorts in CapCut?
Try the web version while signed in, which is where I found it. When I used it on 14 September 2026, Long video to shorts sat in the Popular features row of the signed-in web homepage, alongside the Video Editor, Text to speech and Generate captions. It was there on a free account, not tucked behind an upgrade.
That is the only surface I checked. I did not open the mobile app or the desktop app, so I cannot tell you whether it appears there, and a Reddit thread on the first page of results asks outright whether CapCut removed the feature. If you cannot see it, the web homepage while signed in is the place I can confirm it existed. The tool page itself also carries a card reading "Try our desktop app now and enjoy 1 day of Pro for free", which suggests the desktop version is where CapCut would rather you went.
How many minutes can CapCut convert for free?
Sixty minutes of source video a month, according to the tool page itself, which reads: "You can convert 60 minutes of long videos to shorts for free every month." Pro adds 240 more. The meter counts the length of source video converted, not the clips that come out.
My 35-minute panel took the allowance from 60 minutes to 25, the source length rounded to the minute, so one 35-minute recording used more than half the month's allowance. The same page lists an upload ceiling of three hours and 10GB on the free plan I tested; I did not check whether a paid plan raises it. The clipping minutes are also a separate budget from CapCut's AI credits: my account showed 80 credits, and those belong to its video-generation features, so there is no point saving them up for clipping.
Why are CapCut's shorts so long?
On my run the duration setting was on Auto, and Auto made long clips. The on-screen note says the model will determine the number and duration of the shorts, and my 35-minute panel came back as eight clips running from 1:26 to 3:58, covering 73.6% of the whole recording in order, with no overlap between them.
That is closer to chaptering than to picking highlights, and it is specific to Auto. I later ran both settings against the first 12 minutes of the same panel, both runs on 19 September, on the same free account: under-60s returned three clips of 1:04, 1:05 and 1:08, so it shortens them without actually clearing a minute, and it drops the chaptering — 27.4% of that shorter source against Auto's 88.3%. The other two buttons, 60 to 90 seconds and 90 seconds to three minutes, I have not run.
Where do CapCut exports go after they finish?
Into your cloud Space, and only there, on the free web plan I used. When an export completes, CapCut offers you the file in the dialog. If you minimise or close that dialog before downloading, reopening Export for the same clip offers a fresh export rather than handing you the one that already finished.
The finished file still exists, and it is still using your storage. You can get it back from the Space page by right-clicking its card and choosing Download. What caught me out is that it does not appear under Library, either in Projects or in Generated assets — both stayed empty the whole time I was testing. On the free plan that Space is capped at 512MB, so a render you forgot about is also a render quietly eating the room your next export needs. Download from the dialog, then clear it from Space.
Why did my CapCut export fail?
On the free plan, check your cloud storage first. Every export renders into a 512MB Space before you can download it, and four 1080p exports of clips running two to four minutes took mine past the limit. A later export was refused with a message reading "Couldn't export — Your space is almost full." After I cleared space, my later exports went through: trashing an export freed the quota immediately on my account, taking the counter from about 407MB down to 240 and then to zero.
Two of my exports also failed with no message at all, and I cannot tell you why. They came in the same batch, but nothing on screen tied them to storage, so check Space first without assuming it caused them. The rule I would follow now is one export, one download, one delete, then the next clip, rather than starting several renders and collecting them later.
Keep reading
CapCut review: free 1080p exports, until 512MB stops you
I put a 35-minute panel through CapCut's AI clipping and exported all 8 clips. Watermark-free 1080p on the free plan, but the cloud ceiling bites at clip four.
CapCut pricing: there is no single price, and CapCut says so
CapCut publishes $19.99 a month on one page and says it has no fixed global price on another. Here is the real upgrade screen, and how to find yours.

Free AI clip generator: only one export came back clean
Four AI clip generators, one 35-minute file, two of them on genuine free plans. Only CapCut returned a file with no watermark. Here is what the rest hand back.
The best AI video clipping tool, measured on one file
Four AI video clipping tools, one identical 35-minute file. OpusClip found 32 clips, Submagic 31, Vizard 30 but delivered 10, CapCut 8. What that means.